Its been a while since my last post, well in this post, I am going to share some easy way to overclock your graphics card using ATI Overdrive. This is guide mean for newbies and not for extreme overclock.
*This guide are mainly for ATI Graphics Card, as I have no nVidia graphics card around, but the methods are almost identical.
*Warning: This guide is just for your reference and knowledges, I have no responsible for any damages caused by this Overclocking guide. Be Cautious !!!
Graphics Card that we are going to overclock today:
GeCube ATi 4850 Reference Model.

Specifications:
HD4850 (RV770PRO) (55nm)
Core/Memory Frequency: 625Mhz/993Mhz
Memory Size: 512MB
Memory Type: GDDR3
Memory Bus: 256-bit
Interface: PCI-Express® 2.0
Tools Required:
ATI Catalyst Control Center
Furmark (for Stress Testing purpose)
3D Mark Vantage or 3D Mark 06

Changed the HSF to Scythe Musashi due to poor cooling capabilities of the reference heatsink.

First of all, run your Catalyst Control Center by right-clicking on the desktop, and select Catalyst Control Center.

Select ATI Overdrive and click enable ATI Overdrive box, it will prompt a warning message, proceed by selecting "Yes".
Adjust the slider of the GPU Clock and MEM clock to overclock, it is adviced not to increase the clock too much, adjust accordingly try 5-15Mhz increment each time before performing Furmark and 3D Mark test for stability. Observe for any artifacts when running the test. Try to find your maximum core clock by keeping your mem clock at stock and increase the GPU clock only until you notice artifacts during the furmark test or 3D Mark test. Back down a little, to obtain stability. Same goes to your memory clock, try to keep the GPU clock at stock while finding the max mem clock.

I obtained maximum of 700Mhz for my core clock and 1100mhz for my mem clock, no artifacts noticed or crash occured, back down to around 675mhz / 1050Mhz for long term run.
*Do remember to keep an eye on your graphic card temperature. If its too hot, lower your OC, heat will kill the graphic card in long term run. 3rd Party better cooling capabilities HSF are recommended before OC your graphic card.
Well, after clocked the card we enjoyed some bonus speed from the reference card through overclocking.
There are pre-overclocked non-reference cards available nowadays with better HSF and OC capabilities, that come with slightly higher price tag. In my opinion its worth go get since these cards came with better heatsinks and were able to clock even higher due to better HSF and also better power circuitry. (Eg. 2 phase power circuitry for reference card, 3 phase for Palit's non-reference card)
 I purchased the Scythe Kaze Master 4 Channel Multi-Functional Fan Controller last week and its finally arrived to my door step couple of days ago.
 The fan controller are meant for 12v fans usage with 12watt per channel.
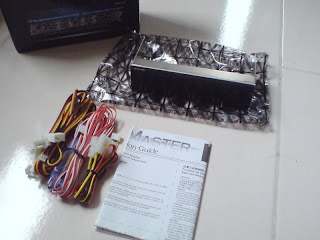 The Kaze master bundled with plenty of wires and thermal sensors.
 Excellent built quality and good PCB design.