Saturday, October 17, 2009

PC-A05N add-ons: Lian Li BS-03

Just came back from my KL trip for my holiday. Did some changes on my PC-A05N built, take out the HDD cage for better airflow for PSU, leaving only primary HDD as the only HDD unit in the casing. Installed the Lian Li BS-03 side patented fan to improve the air flow of the case, especially the VGA compartment.

Photobucket
Swapped out 500gb HDD now will sit in here as my external HDD, 80gb HDD will keep in my shelf as backup HDD.

Photobucket

Saturday, October 10, 2009

Lian Li PC-A05N Water Cooled Mini i7

Phew... finally complete migrating all my hardware from the Old Good CM Stacker STC-01 to this little mini tower case from Lian Li. Specification mostly the same as the previous built but now with smaller radiator, means no more 4.2ghz run. But the Syscooling 120mm radiator I am using surprisingly yield quite impressive results. I able to handle 4.2ghz for prime run but crashed at LinX run. For 4.0ghz, it was on par or even better than Swiftech MCR-320QP from my PC-A6010 setup acting as intake instead of exhaust.

Enough talking, time to show off this little powerful rig.
Photobucket

The hardware components inside. Intel Core i7 920 @ 4GHZ, 6gb Kingston DDR3 1333 @ 1523, ASUS 4890 (3D rendering), MSI GTX260 (Physx mode), Corsair TX750.

Water Cooled components, DD CPX-Pro, Bitspower Bay reservoir, D-Tek Fuzion v2, Syscooling 120mm Copper radiator.

Photobucket


More to come about the ATI + Nvidia Physx run...

Saturday, August 29, 2009

ASUS P6T and KVR1333 @ 210 BCLK @ DDR3 1678

After some working days, finally get some free time, time to tweak my PC system.

System Components:
Intel Core i7 920 C0/C1 stepping
ASUS P6T 0502 BIOS
6gb Kingston DDR3 1333 Value Ram
ASUS 4890
Western Digital 80GB HDD. (WD80JD)
OS = Windows 7 RTM version.

Cooling system:
D-Tek Fuzion v2, Swiftech MCR320QP, Danger Den CPX-Pro, Bitspower drive bay reservoir.

The main objective of this run is to try out higher BCLK + RAM frequency at around 4ghz clock for CPU frequency. Here is the screenshot after LinX run and Memtest run to make sure everything is stable.

Photobucket Although its nothing special for this tweak since I think most people who into overclocking shall reach it. This is my first time success of pushing my system past 200 BCLK stably and to my suprise my value ram which rated at 1333 able to reach DDR3 1678. So I am quite satisfied with the outcome, and I will tweak my system again in future when I got the free time.

Friday, August 21, 2009

DDR3 1333 Kingston Value Ram

PhotobucketBought 3 stick of 2gb DDR3 1333 Kingston Value RAM last week just in time before the price hike in the memory market hit Malaysia. Bought it with the price before price hike, so glad that I was able to made it just in time for the cheaper ram.

The ram modules I got no longer were the hynix chips, which previous batch of KVR module were using, instead they are replaced by qimonda chips. The hynix according to some forumer over at lowyat forum, is quite OC'able, at least it does ddr3 1600++ CL8/CL7.

PhotobucketPhotobucket

So, after getting the KVR 1333 2gb stick with qimonda chip, I tryout how fast these qimonda batch KVR can do. Surprisingly, it does DDR3 1520 CL9 stable, not bad although its not as good as the hynix chip.

Photobucket
With Vista x64 Ultimate, the size of memory does impact performance of a PC. I opted to upgrade to 6gb kit as it benefits more using Vista x64 compare to 3gb Kit. This time I save cost by getting the value ram over performance ram as stated in my previous article, the difference is not much, and I managed to push it to DDR3 1520 just like my previous 3gb Team Xtreem Kit could do. I have not pushed the chip to the max as I do not want to mess up with current settings I got which is 190 BCLK * 21 @ 3990MHZ with DDR3 1520. But I believe these Qimonda batch KVR able to push to higher speed as DDR3 1520 definitely not maxing out them yet.

Thursday, August 13, 2009

Intel Core i7 In-Depth Performance Scaling Analysis from Madshrimps

PhotobucketPhotobucket
I came across this useful article Intel Core i7 In-Depth Performance Scaling Analysis, while surfing over at MADSHRIMPS. The article is quite useful for i7 user that interested to overclock their PC as it has lot of analysis data for different overclocks and performance gain from them.

The article analyze the overclocks of QPI Links, Uncore frequency, CPU frequency, BCLK frequency and memory frequency. Other than that, it also covers memory latency and channels performance scaling.

The results show that overclocking CPU frequency yields the best performance gain followed by uncore frequency. But then, the overclocking uncore frequency is the only way to get higher memory clock since the 1:2 Memory frequency to Uncore frequency in Core i7.

In short: the third memory channel increases the bandwidth SO much that even a 4GHz uncore can't really keep up with the enormous amount of data coming from the memory. Overclocking helps to reduce this problem.

What surprises me from the article is the performance gain with memory frequency overclocking, overclocking memory frequencies does not seems much difference, it only show difference in Everest memory benchmark and does not help much in gaming. And when it comes to latency CL6 is not that much faster than CL8 or even CL9, 1T and 2T difference are not even 1%. And also the minimal gain from third channel of ram, dual channel seems the are the optimum channels.

So in conclusion, I think that for regular user there are no point to go for mid or high end kit performance ram which cost double or triple the price of the value ram. Unless you are really a benchmark enthusiast that want maximum performance form your PC. We can usually overclock ram frequency of value ram to some decent speed depends on luck and chip that the value ram used. On some X58 motherboards it's actually quite easy to tune your low-clocking memory kit to have the performance of a highly overclocked memory kit by changing the Back-to-back Cas Delay memory timing.


Photobucket
For PC and benchmark enthusiast that want maximum performance only, not for Gamers that just want smooth frame rates. Indeed spent the amount of money saved on purchasing a value ram and invest it on a high performance graphic card yield more performance gain. But if you got the cash, why not...

Wednesday, August 12, 2009

Energy Efficient Atom Based File Station and Net surfing PC

PhotobucketWith the recent increase in electricity billing charges, I decided to built a new machine to serve the purpose of 24/7 downloading, internet surfing, file sharing, web based application hosting energy efficient PC. Talking about energy efficient with processing power that capable enough for full time downloading and internet surfing, I immediately think of the Intel Atom processor.

Photobucket

What is Intel Atom? Intel Atom is Intel's smallest chip. It is built with the world's smallest transistors. As Intel's smallest and lowest power processor, the Intel® Atom™ processor enables the latest Mobile Internet Devices (MIDs), and another new category of devices for the internet called netbooks and nettops. Intel® Atom™ processors were newly designed from the ground up, 45nm Intel® Atom™ processors pack an astounding 47 million transistors on a single chip measuring less than 26mm², making them Intel's smallest and lowest power processors. All this while delivering the power and performance you need for full Internet capabilities.


Photobucket
There are numerous of Intel Atom motherboard and processor combo available around the market, after some survey and budget tinkering, I decided to opt for the Intel D945GCLF2D, Intel Atom processor 330 Dual Core set. The main reason I opted for the this was due to the cheaper price tag compared to other same solutions and also I do not need HDMI and the better 9300GS VGA from the Nvidia ION platform.

To further emphasizing the power saving capabilities of the Intel Atom 330 platform, I come across some articles over the Internet with experiment done to calculate the exact power consumption comparing Atom 330 and E8500.

According to the article, they compare a E8500 @ 3.16GHz on Asus P5E3 Premium system with Atom 330 @ 1.6GHz on Intel D945GCLF2, listed below are the data of the experiment,

The main advantage the Atom 330 has is low power consumption - supposedly it has a maximum total power draw of 8W.

Here is some experimental data:
· E8500 @ 3.16GHz on Asus P5E3 Premium: 92W idle, 118W loaded
· Atom 330 @ 1.6GHz on Intel D945GCLF2: 41W idle, 45W loaded
It looks like going to full load from idling at the desktop the Atom 330 only used 4W more - so the 8W TDP figure is quite believable.

Let's say it is being deployed as File Server/Download Server for 24h/day, it would idling most of the time. So let's calculate how much power would be used in a year.
24h/day * 365 days = 8760 hours

Atom 330 @ 41W * 8760 hours = 359,160 W/hr = 359.16kWhr
E8500 @ 92W * 8760 hours = 805,920 W/hr = 805.92kWhr

Now let's say we pay $0.10/kWhr
Atom 330 would use $35.91 in electricity running for a year
E8500 would use $80.59 in electricity running for a year.

Now let's say we are in a place that charges $0.25/kWhr
Atom 330: $89.79 for a year
E8500: $201.48 for a year

Where electricity is expensive, a small Atom 330 based home server would save the cost of the motherboard in less than a year!


The file-station will be installed with Windows XP Professional SP3 O/S with IIS hosting capabilities. The downloading and file sharing task will be supported by suitable software. The system spec is as following:

- Intel BOXD945GCLF2D Intel Atom processor 330
- 2GB Team Elite DDR2 800
- Intel GMA950 Onboard Display
- Built in Audio
- Western Digital 200GB SATA HDD
- Cooler Master 350W PSU
- Lian Li PC-A6010 casing (a bit weird with ITX mobo on an ATX casing)


With this system setup, I can enjoy 24/7 downloading, file sharing in a fairly low running cost with processing power that capable enough to take the job.


Reference: Neoseeker Intel D945GCLF2 & Atom 330 Review

Tuesday, August 11, 2009

Corsair H50 Compact Liquid Cooling Kit

Photobucket

The Corsair H50, I came across this cooler few days ago while surfing the web. The Corsair H50 liquid cooling kit is a compact pre-filled liquid cooling kit, it is very user friendly, easy to install and least maintenance required. I was messed around with mid high end DIY liquid cooling kits. It is true that they are hard to install, require some modding on the casing itself for big radiator installation, and they are lot of work during the maintenance job. It is regularly takes up few hours or even almost half a day just to get the water cooling loop properly setup, it would take almost a whole day inclusive leak test and hardware installation. Most people stay away from high end DIY liquid coolers due to reasons above.

Many thought that compact liquid cooling kit always lose to high end air cooling heat sink such as TRUE120, IFX14, etc, this in fact were true on those crappy thermaltake kit. However, with the Corsair H50, most reviews show that it can beat the high end air cooler.

I come across this video while surfing at Ianho's ( famous PC modder in Malaysia ) blog.

Its a funny video that Corsair name the air cooler Brand X, and it shows that the H50 do beat the high end TRUE air cooler.

Other than that, here are some reviews about the H50:

Corsair Hydro Series H50 CPU Cooler Review from Bit tech.
Corsair Hydro Series H50 CPU Cooler Review from Madshrimps.

In my opinion, a good compact liquid cooling kit such as the Corsair H50 or the CoolIt Domino ALC has the capabilities to beat high end air coolers if the radiator are properly located to intake fresh air instead of hot air inside the case. Take the Corsair's review in Bit Tech as example, setting up the fan at the radiator as intake yields better result than acting as system's exhaust. Besides that, the water block that are small in size provide empty spaces around the CPU area allowing user able to use ram cooler or Mosfet cooler around that area. Unlike high end coolers which is huge in size that restrict user to use other cooler around CPU area.

The Corsair H50 liquid cooling kit are now in retail market in Malaysia, you can get them at Moderno PC or CEX Computer or any retail shop that carry the product.

Monday, June 22, 2009

Project: Stacker Revamp Completed


Objective:
Reuse my Cooler Master Stacker STC-T01 casing which sitting in my store room in quite a while.

Scope:

Repaint the casing internals to black colour.
Cut the top panel of the casing to fit 3x120mm radiator.
Repaint the external to Gold + Black theme. ( Not yet final decision )
Mod the case to become more water cooling friendly case.

Casing:
Cooler Master Stacker STC-T01


Water Cooling Components:

D-Tek Fuzion v2 with i7 bracket, Swiftech MCR-320QP, Danger Den CPX Pro Inline pump, Bitspower 5"25 Bay Reservoir,1/2" OD Chrome Barbs, 7/16 ID tubings.


Major PC Components:

Intel Core i7 920, ASUS P6T, Team Xtreeme 3x1gb DDR3 1600 CL8, ASUS 4890.

Phase 1: Repaint the motherboard tray.

Everything were taken down, drill out the rivets to take out the PSU cage for painting and cutting jobs.

Picture above show that the old surface was rusted. It was then being sanded to prepare the surface for spray painting.

The paint station being setup and the paint job has started. Picture above was taken during the mid of paint job.


The final product was quite statisfied by me, at least my first spray paint job went through succesfully.


Post another shot to conclude phase I, it had when through succesfully, the paint job were good and everything went on well. I shall proceed to phase II which involve cutting the top panel to fit 3x120mm radiator next week.


There are change of plan according to the original plan, instead of going for Black-Gold theme, I decided to make it full black and sent it to powder coat to make it pure black edition Stacker. Here are some pictures after the powder coating job and initial built.


Photobucket

Front view with the Bitspower bay reservoir, Scythe Kaze Master, Multifunctional Bay Panel etc


Photobucket

Top View with AC Ryan 3x120mm rad grill.


Photobucket

Shot of interior of the built with all hardware installed inside. With water cooling components, case accessories and PC Hardware.


Photobucket

Close up shot of CPU block, Pump, and Radiator.


Photobucket


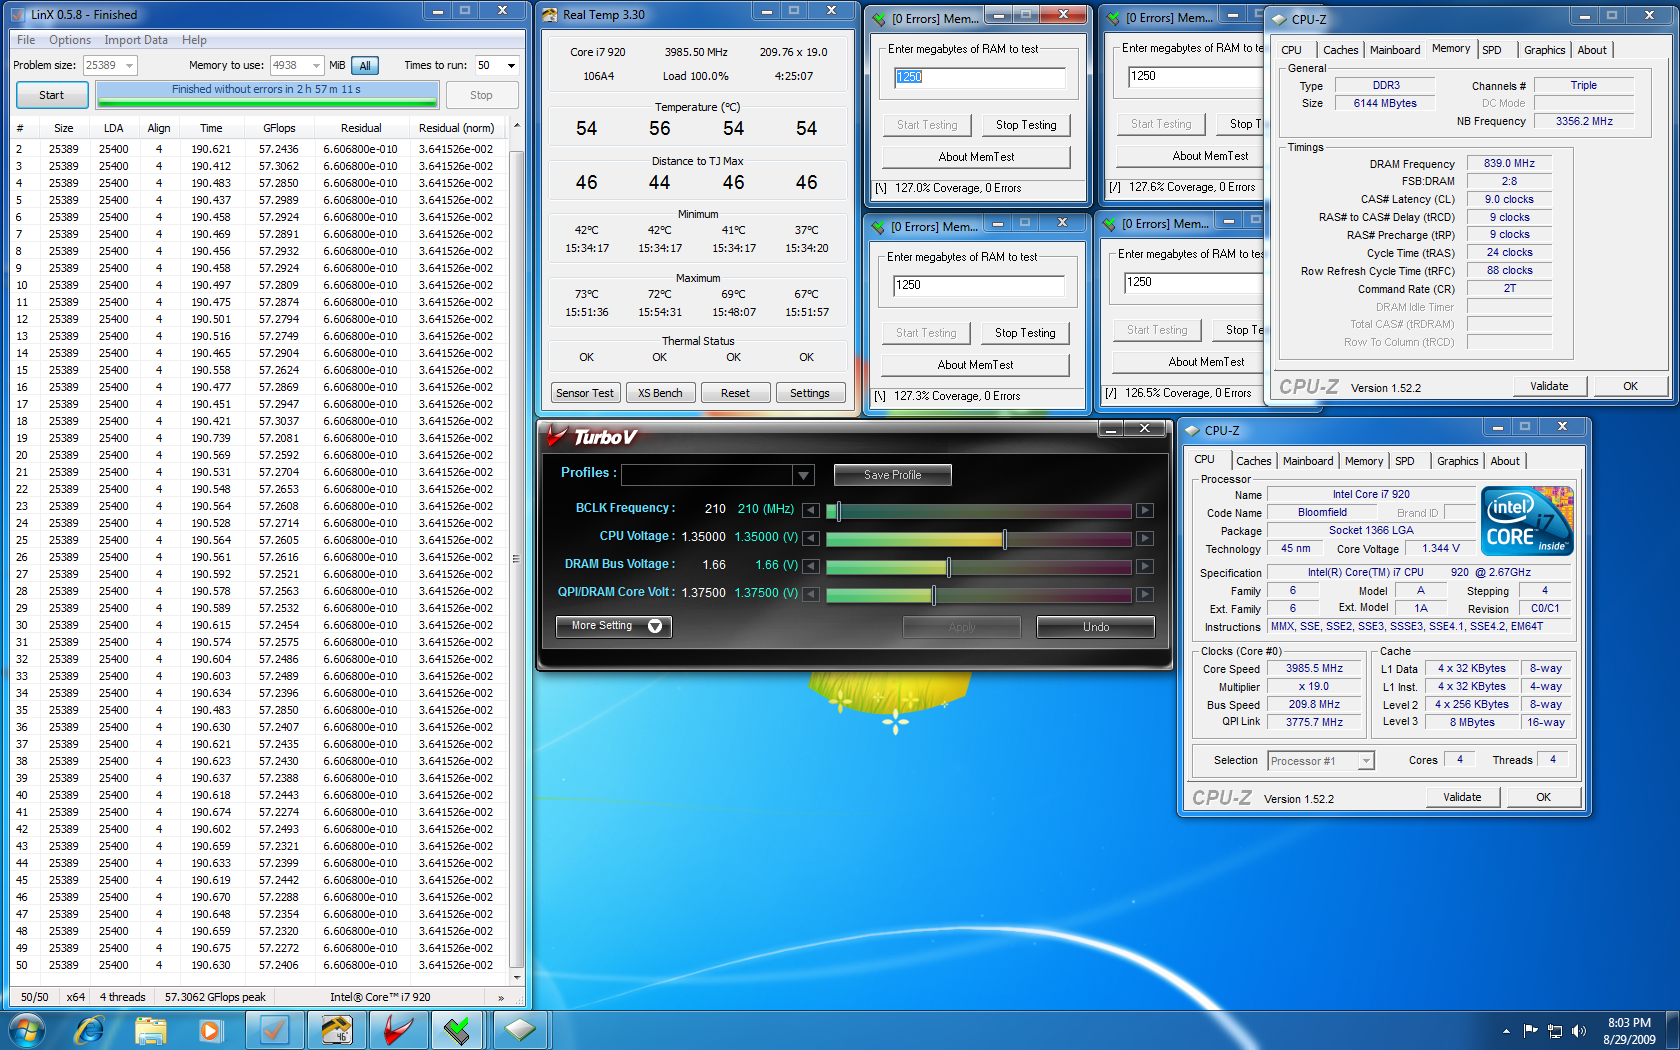
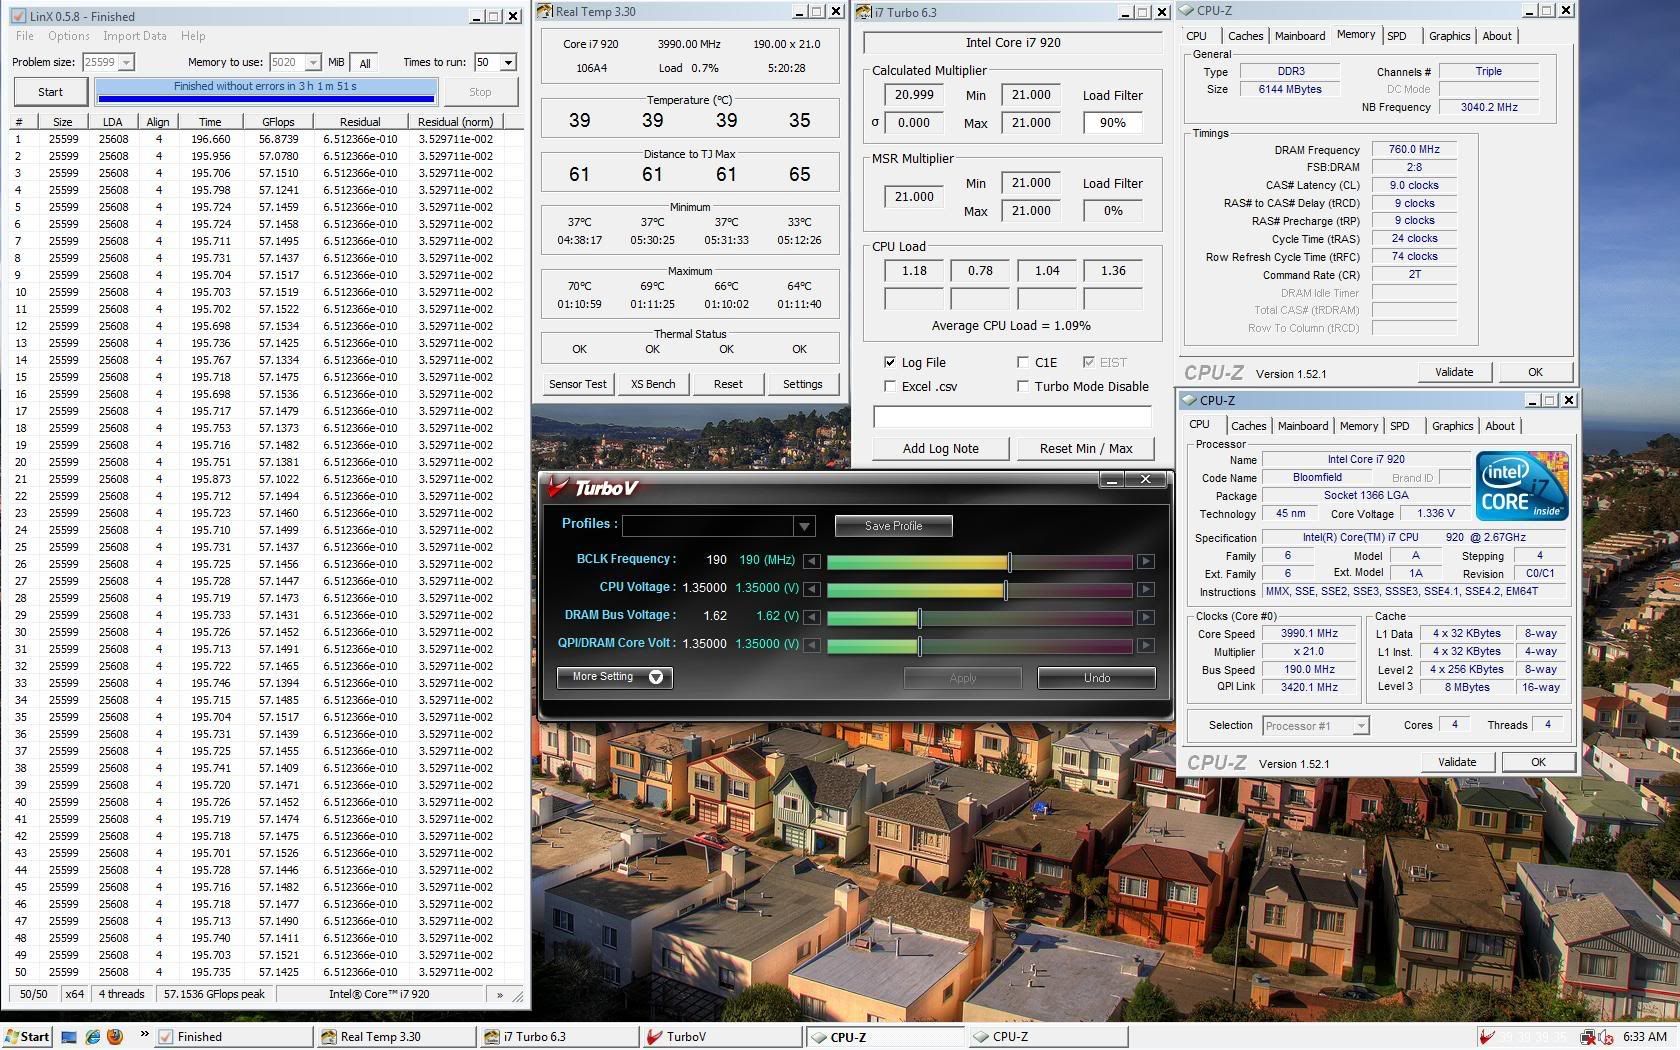
The Stacker revamp project have been done 90% so far, there are still to be minor changes in future such as PCI slot covers, Top radiator compartment rear cover, and better cable management. After changing the radiator to MCR-320QP from MCR220-QP I got around 5-10c (depends on ambient) improvement over the previous setup. I can achieve 3.99ghz OC with HT off at core temp at around 66-72c LinX stress test.


Below are more pics of the project:

PhotobucketPhotobucketPhotobucket

Thursday, May 21, 2009

Lian Li Aluminium Bezel with Vent and Filter

Visited Lowyat Plaza last few days, visited one of my favourite store, ATE. Suprisingly, I saw the new batch of Lian Li casings and accesories have reach there. So bought this:


Yay !!! Now my system have better airflow than before, the radiator are taking in fresh air from the vents. CPU temp dropped 2-3c, so as system temp.
This is the only update available at May due to exams. More projects to come this coming June.
Stay tuned...

Monday, April 20, 2009

Something I made to save table spaces.


Recently surfing around the web and see others people's invention to save spaces for a small table. After searching around the market for sources and materials, I made an U-Shaped acrylic mini table alike rack to solve this problem. Its hard to find this kind of thing in the market, especially made by acrylic.

Pictures above shows that how it really help out to save spaces for a table, you would slide the keyboard to bottom of you LCD monitor easily when you need the table space for other job.
The acrylic rack are made using 10mm acrylic and strong enough to hold certain amount of weight, but its not suitable for CRT monitor for sure. I currently got 2 units available for sale as I've made 3 units of it. So if anyone interested, you can contact me for details. Pricing are around RM 85 (contact me to nego).


Friday, April 17, 2009

Recent Purchase

My Recent loot:


Its DLink DGS-1005D Gigabit Switch and Cruzer Contour 16gb Pendrive.

My room is officially GigaLAN now, making the file transfer between my link station and PC faster than ever.

The 16gb Cruzer Contour is a high speed pen drive, now i can move my media to my pendrive faster than ever... !!! LOL...

New Pump, Danger Den CPX-Pro

Its been a while since the last post. Well I've update my PC a bit. Removed DVD-ROM, better cable management and a new smaller and stronger pump, the DD-CPX Pro 18W pump. Temperature decreased by few Cs due to lower heat dump from the pump compare to D4/D5.

Let's the pictures do the talking:


Wednesday, March 18, 2009

Some add-on to my PC - The Scythe Kaze Master


I purchased the Scythe Kaze Master 4 Channel Multi-Functional Fan Controller last week and its finally arrived to my door step couple of days ago.

The fan controller are meant for 12v fans usage with 12watt per channel.

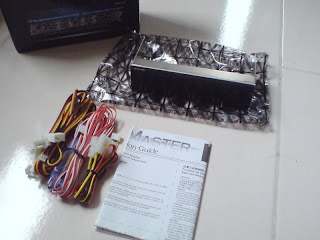
The Kaze master bundled with plenty of wires and thermal sensors.

A zoom-in view for the Kaze Master.
Excellent built quality and good PCB design.

Finished install onto my i7 system, the Kaze Master serve its purpose to control fan speed (provide a much more silent system and yet flexibility of providing high air flow when its needed) and also provide cool lookings for the system.


Pros:
12Watt Per Channel
Excellent built quality
Can turn off the fan if turned the knob to minimum(full counter clockwise)
Cool looking
Temperature Monitoring
Cons:
Come in expensive price tag

Monday, March 9, 2009

Simple ATi 4850 Overclocking Guide using ATI Overdrive

Its been a while since my last post, well in this post, I am going to share some easy way to overclock your graphics card using ATI Overdrive. This is guide mean for newbies and not for extreme overclock.

*This guide are mainly for ATI Graphics Card, as I have no nVidia graphics card around, but the methods are almost identical.

*Warning: This guide is just for your reference and knowledges, I have no responsible for any damages caused by this Overclocking guide. Be Cautious !!!

Graphics Card that we are going to overclock today:

GeCube ATi 4850 Reference Model.
Specifications:

HD4850 (RV770PRO) (55nm)
Core/Memory Frequency: 625Mhz/993Mhz
Memory Size: 512MB
Memory Type: GDDR3
Memory Bus: 256-bit
Interface: PCI-Express® 2.0

Tools Required:
ATI Catalyst Control Center
Furmark (for Stress Testing purpose)
3D Mark Vantage or 3D Mark 06

Changed the HSF to Scythe Musashi due to poor cooling capabilities of the reference heatsink.


First of all, run your Catalyst Control Center by right-clicking on the desktop, and select Catalyst Control Center.

Select ATI Overdrive and click enable ATI Overdrive box, it will prompt a warning message, proceed by selecting "Yes".

Adjust the slider of the GPU Clock and MEM clock to overclock, it is adviced not to increase the clock too much, adjust accordingly try 5-15Mhz increment each time before performing Furmark and 3D Mark test for stability. Observe for any artifacts when running the test. Try to find your maximum core clock by keeping your mem clock at stock and increase the GPU clock only until you notice artifacts during the furmark test or 3D Mark test. Back down a little, to obtain stability. Same goes to your memory clock, try to keep the GPU clock at stock while finding the max mem clock.


I obtained maximum of 700Mhz for my core clock and 1100mhz for my mem clock, no artifacts noticed or crash occured, back down to around 675mhz / 1050Mhz for long term run.

*Do remember to keep an eye on your graphic card temperature. If its too hot, lower your OC, heat will kill the graphic card in long term run. 3rd Party better cooling capabilities HSF are recommended before OC your graphic card.

Well, after clocked the card we enjoyed some bonus speed from the reference card through overclocking.

There are pre-overclocked non-reference cards available nowadays with better HSF and OC capabilities, that come with slightly higher price tag. In my opinion its worth go get since these cards came with better heatsinks and were able to clock even higher due to better HSF and also better power circuitry. (Eg. 2 phase power circuitry for reference card, 3 phase for Palit's non-reference card)